- NEED HELP? CALL US NOW
- +919995411505
- [email protected]

Final Tooth Preparation Stage
When the extension and wall designs have fulfilled the objectives of initial tooth preparation, the preparation should be inspected carefully for other needs.
With conservative amalgam restorations, the preparation may be complete after initial tooth preparation except for sealing the prepared walls for amalgam.
Steps In Final Tooth Preparation
- Removal of any remaining enamel pit or fissure, infected dentin, or old restorative material, if indicated
- Pulp protection, if indicated
- Secondary resistance and retention form
- Procedures for finishing the external walls of the tooth preparation
- Final procedures: cleaning, inspecting and sealing
Removal of Any Remaining Enamel Pit or Fissure, Infected Dentin, or old Restorative Material, If Indicated
Removal of any remaining enamel pit or fissure, infected dentin, or old restorative material is the elimination of any infected carious tooth structure or faulty restorative material left in the tooth after initial tooth preparation. ·
- Removal of remaining enamel pit or fissure
- Removal of remaining enamel pit or fissure occurs as a small, minimally extended excavation on isolated faulty areas on the pulpal floor.
- Lasers, microabrasion units and other technologically advanced systems all have been proposed but none has shown complete reliability.
Techniques
Large areas of soft caries are best removed with spoon excavators by flaking up the caries around the periphery of the infected mass and peeling it off in layers. Leaving carious dentin at the DEJ area is unacceptable.
The bulk of this material is removed easily in a few large pieces.
Regarding the removal of the harder, heavily discoloured dentin:
- Use of spoon excavators
- Round steel burs at very low speed
- Round carbide burs rotating at high speeds
Pulp Protection
When remaining dentin thickness is less, pulpal injury can occur because of heat production, high speed burs with less effective coolants, irritating restorative materials, galvanic currents due to fillings of dissimilar metals, excessive masticatory forces transmitted through restorative materials to the dentin and ingress of microorganisms and their noxious products through microleakage.
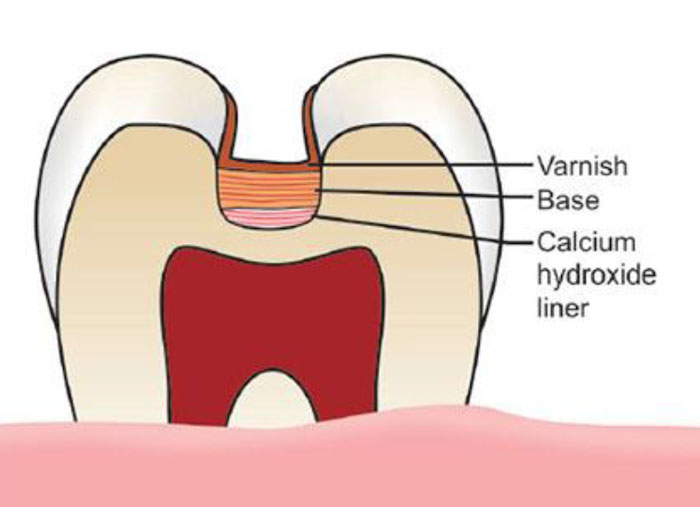
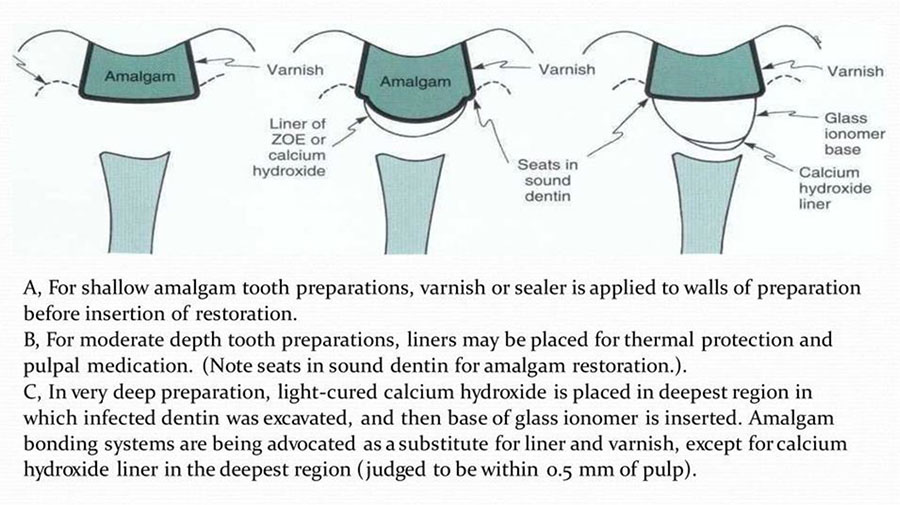
Pulp protection is achieved using liners, varnishes and bases depending upon:
- The amount of remaining dentin thickness
- Type of the restorative material used.

NOTE
Liners, Varnishes, Bases:
Liners and varnishes are used where preparation depth is shallow and remaining dentin thickness is more than 2 mm.
They provide:
- Barrier to protect remaining dentin and pulp
- Galvanic and thermal insulation. Bases are the cements used on pulpal and axial walls in thickness of about 0.5 to 2 mm beneath the permanent restorations.
- They provide thermal, galvanic, chemical and mechanical protection to the pulp.
- Commonly used restorative materials as base are zinc phosphate cements, glass ionomers, polycarboxylate cements, zinc oxide eugenol, and calcium hydroxide cement.

Secondary Resistance & Retention Form:
This step is needed in complex and compound tooth preparations where added preparation features are used to improve the resistance and retention form of the prepared tooth.
These are as following: Grooves and coves:
Wherever bulk of dentin is present, grooves are prepared without undermining the adjacent enamel.
Coves are small conical depressions Grooves are placed in prepared in healthy dentin to provide additional axiofacial and retention. axiolingual so as line angles to increase retention of the restoration
| RETENTION LOCKS,GROOVES AND COVES | |
| Vertically oriented retention locks and retention grooves | for proximal portions of some conventional tooth preparations(locks for amalgams) |
| Horizontally oriented retention grooves | class Ⅲ and Ⅴ preparations for amalgam |
| Retention coves (appropriately placed undercuts) | incisal retention of class Ⅲ amalgams -occlusal portion of amalgam restorations - class Ⅴ amalgams |
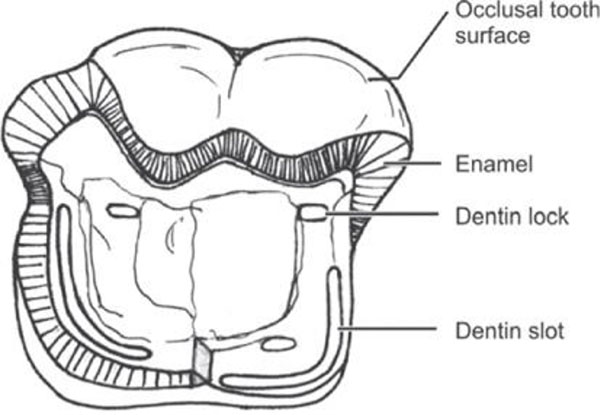
Slots or internal boxes:
- These are mainly used in amalgam restorations.
- They are 1.0 to 1.5 mm deep box like grooves prepared in dentin to increase the surface area.
- These are SLOT prepared in occlusal box, buccoaxial, linguoaxial and gingival walls.
- Locks: Locks are usually prepared for amalgam class II restoration in the proximal or occlusal box of class II

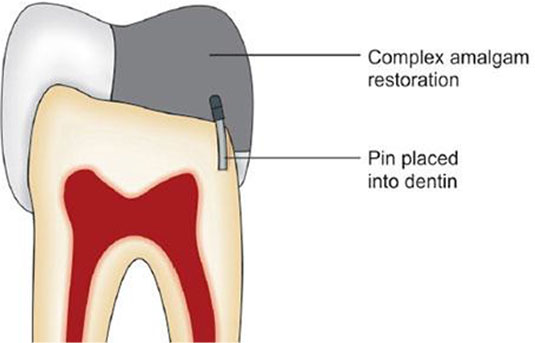
Pins:
- Different types of pins of various shapes and sizes are used to provide additional retention.
- They can be used in all types of restorations like amalgam, composite and cast restorations.
- Skirts: Skirts are prepared for providing additional retention in cast restorations. They increase the total surface area of the preparation.
- Skirts can be prepared on one to all four Skirt in cast restoration sides of the preparation depending upon the required helps in increasing retention retention
Amalgam pins:
- Amalgam pins are vertical posts of amalgam anchored in dentin.
- Amalgam pins increase the retention and resistance of complete restoration.
- Beveled enamel margins: Beveling of the preparation margins increases the surface area and thus, the retention in composite restorations.
- Enamel wall etching: Etching results in microscopic roughness, which increases the surface area and thus

Finishing of Enamel Walls & Margins
Finishing of the enamel margins should be done irrespective of restorative material used. During finishing there occurs the further enhancement of the cavosurface design and smoothness that produces the maximum adaptation of restoration to the walls and the margins and maximum effectiveness of restoration.
The finishing of the preparation walls results in:
- Better marginal seal between restoration and tooth structure.
- Increased strength of both tooth structure and restoration at and near the margins.
- Strong location of the margins.
- Increase in degree of smoothness of the margins.
Location of the margins:
- During finishing of the preparation walls and margins, one should follow the principles of paralleling the direction of enamel wall.
- The knowledge of enamel rods is necessary for proper finishing of the preparation margins.
- At the margins, all the enamel walls should have full length rods supported by dentin. Features of finished preparation:
- The design of cavosurface angle depends on type of restorative material being used. For example, for amalgam restoration, cavosurface angle of 90 degrees affords maximum strength to tooth restoration.
Final Procedures; Cleaning, Inspecting And Sealing
The final step in tooth preparation is cleansing of the preparation. This includes the removal of debris, drying of the preparation, and final inspection before placing restorative materials.
Objectives:
- Cleaning of preparation walls, floors and margins from enamel and dentin chips resulting during tooth preparation
- Remove all the debris from the preparation, especially on the margins, otherwise deposits left on them consequently dissolve, resulting in a micro leakage which further can result in secondary caries.
- Cleaning of preparation can be done by using warm water. Immovable particles of debris can be removed with the help of a small cotton pellet dampened with water or hydrogen peroxide.
- Drying the tooth preparation before insertion of the restorative materials: It can be done using air, dry cotton pellets and commercial cleaners.
- It is important that teeth are not dehydrated by overuse of air or hot air.
- Sterilization of preparation walls using very mild alcohol free disinfectant: Use of mild disinfectant


